Use these instructions to perform a thorough inspection on virtually any cooling tower. These instructions are completely general, so some portions won’t apply to your tower. When you’ve filled out the checklist, use the results to help plan your cooling tower repair and maintenance. Always refer to your tower’s user manual if you have specific questions about your cooling tower.
As always, the S&S Equipment team is here to help with the below and happy to schedule a time to meet onsite to look at anything you have questions about. Our warehouse is stocked with OEM parts for all our products, and we are ready to help you get your system in tip-top shape!
The link below will take you to a downloadable PDF checklist that you can use to note anything you find as you go through this list.
CLICK HERE TO DOWNLOAD PDF CHECKLIST!
STRUCTURE
CASING MATERIAL
- Check for leaks (including air leaks between adjoining panels), cracks, holes, general deterioration

- Hardware attaching the casing to the structure should be tight and in good condition
- Inspect casing
- Steel – look for corrosion or scale buildup
- Wood – look for wood decay (soft rot or plywood delamination)
- Fiberglass – look for brittleness or cracking
- ACB (asbestos cement board) casing
- If budget allows, consider replacing immediately, regardless of condition
- In handling and/or disposing of ACB or ASB material, it is recommended that you contact an Asbestos Abatement Company for information concerning specific state regulations and requirements for handling and the disposal of asbestos waste.
- Make sure access doors are in good working order
- Access doors should be shut tightly when tower is in operation
STRUCTURAL MATERIAL
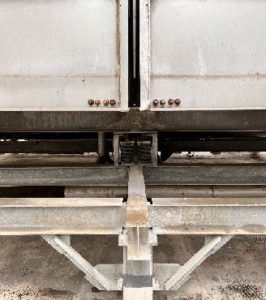 Check for metal corrosion – loss of metal, tightness of bolted joints
- Especially note corrosion near welded joints on galvanized steel towers
- Check for wood deterioration – cracks, fractures, or decay
- Inspect both visually and by tapping with a hammer – a dull, low pitch sound indicates softness, while a higher pitched sharp sound indicates good solid wood. If you find soft spots, carefully probe with an ice pick or similar device.
- Pay particular attention to the wood around steel or cast iron fasteners, connectors, and the bottom of columns
- Check the tightness of bolted structural joints, as well as corrosion or deterioration on joint connectors
- For fiberglass/plastic tower joints – look for tearing or cracking
- Hardware should be tight and in good condition
FAN DECK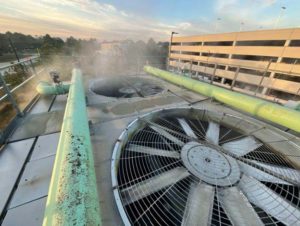
- Fan deck material – check for steel corrosion or wood decay
- Support members should be in good condition and connections between the fan deck and supports should be tight
- Check for air leaks between adjoining fan deck panels
- Loose fan deck overlays are a tripping hazard – be sure they are properly attached, and material is in good condition
- Consider replacing ACB overlays immediately, regardless of condition
STAIRWAY
- Check for wood decay or steel corrosion
- Check for loose treads, handrails, or deteriorated stringers
- All bolted connections should be tight and hardware in good condition
LADDER AND HANDRAIL
- Check the general condition of material
- All connections between the ladder and the tower should be tight and in good condition
- Check the welds on steel and aluminum ladders
INTERIOR WALKWAY
- Wood or fiberglass – check for broken or deteriorated treads and rails
- Steel – check for corrosion
- Check the tightness of connections between the walkway and the tower structure
- Pay particular attention to any damage or deterioration that may pose a potential safety hazard for operating and maintenance personnel
COLD WATER BASIN
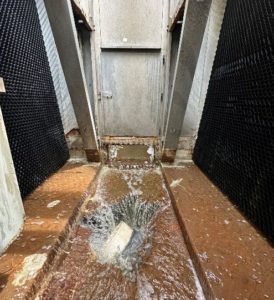
 Check for excessive buildup of sludge and accumulated debris (provides an ideal breeding ground for bacteria)
- Check the sump, sump screen, and anti-cavitation device (if one is used)
- Sump screen should be free of trash
- Note particularly any corrosion or loss of metal in cold water basin components
- Inspect wood, steel, and fiberglass basins carefully for any signs of leaks or breakdown of sealing material
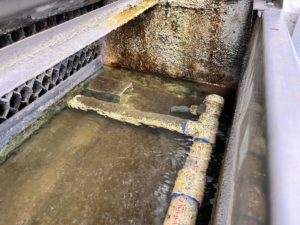
WATER DISTRIBUTION SYSTEM
DISTRIBUTION BASIN 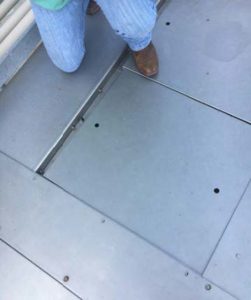
- Check for deterioration of basic material – wood decay or steel corrosion
- Check for leaks between adjoining panels
- Check the integrity of basin support members
- Check the tightness of bolted joints in steel or fiberglass basins
PIPING
- Iron pipe – check for corrosion and loss of coating material
- PVC or fiberglass – check for deterioration
- Supports – ensure their integrity for continued service
- Spot check for leaks and for tightness of bolted joints
BASIN FLOW-CONTROL VALVES
- Valve components – check for corrosion or signs of wear
- Operate valve manually through its full range of travel and reset the valves to balance water flow to all basin sections
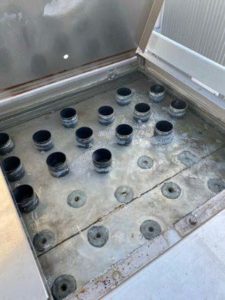
SPRAY NOZZLES
- Check for clogging or signs of internal wear
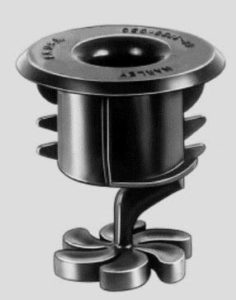
- If necessary, temporarily remove a nozzle and disassemble it to look for internal clogging
- All nozzle components (i.e. removable splash plates) should be in place and working properly
- Look for any loss of material resulting from corrosion or erosion
- Check for adequate connection to branch pipe or distribution basin floor
HEAT TRANSFER SYSTEM
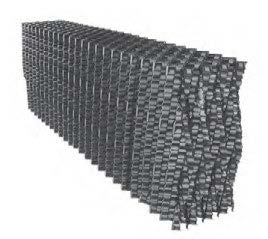
FILL (PACKING)
- Splash fill – wood/plastic bars in various shapes, supported in a fixed spacing and orientation (usually using a wire or fiberglass grid) or ceramic bricks
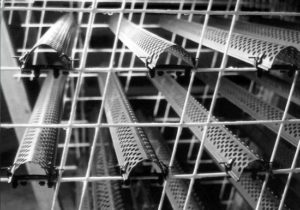
- Splash bar condition – check for sagging, broken, decay, excessive scale buildup
- Check for fallen or misplaced splash bars
- Supporting grids should be in place and evenly spaced
- Check the coating on steel grids, the weld condition on stainless wire grids, or the general condition of fiberglass grids – replace if excessive deterioration
- Check the tower members which support the grid itself
- For reference purposes (in case you need to order parts), you should note:
- Material of splash bars and grids
- Horizontal and vertical spacing between adjacent splash bars
- Whether splash bars are installed parallel or perpendicular to the louver face
- Shape of the splash bar (wood lath, T-bar, V-bar, M-bar, half-round, etc.)
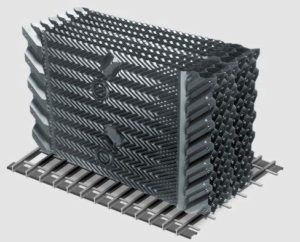
- Film fill – multiple parallel formed sheets, either hung in the tower or resting on fixed support members
- Surface of sheets – check for buildup of scale, algae, or other contaminants
- Check for erosion, sagging, torn sheets, or evidence of ice damage
- Check the general condition of support members
- Note sheet material and spacing in case you plan to order parts
- In either case, consider replacing asbestos fill immediately. You’ll also benefit from improved performance from the modern families of high-efficiency fill designs.
DRIFT (MIST) ELIMINATORS
- Cleanliness and effectiveness of drift eliminators are critical in preventing the spread of Legionella pneumophila bacteria
- Air passages – check that they are clear of debris, as clean as possible, and all components are properly installed
- Seals – make sure water doesn’t bypass the eliminators through deteriorated or missing seals
- Wood blades and frames – subject to severe conditions, check for rot and decay
- In case you need to order replacement parts, note the material and configuration of drift eliminators
- Major types: wood blades, plastic blades, and PVC cellular configurations (including eliminators molded on the fill sheets)
LOUVERS
- Make sure that all louvers are in place – note material, arrangement and vertical spacing of louvers
- Typical varieties: plywood, steel, ACB, fiberglass and cellular configurations molded on the fill sheets
- Consider replacing ACB louvers immediately regardless of condition
- Deterioration of the base material – check for wood rot or corrosion of steel louvers, excessive scale buildup/biological growth
- Check the condition of louver support members and connections between the louvers and the tower itself
MECHANICAL EQUIPMENT
[TURN FAN OFF BEFORE INSPECTING!]
BELT DRIVE FAN SYSTEM
- Pulleys – check for corrosion or loss of metal in pulley grooves or on webs
- Bushings holding pulleys on the shafts should be tight and in good condition
- Belt – make sure there is proper tension and alignment, check for signs of wear (i.e. checks and gouges) that indicate belts should be changed
- Fan shaft bearing lubricant – re-lubricate if needed, shafts and seals should be in good condition
- Bearings – check if they are loose or damaged, make sure all connections between the bearing housing and the support are tight and in good condition
- Support – check for corrosion or other damage, check the tightness of connections between the support and the tower structure
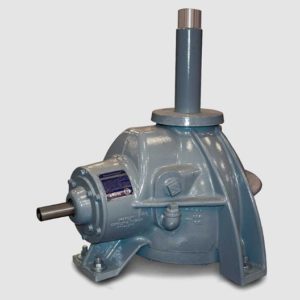
GEAR BOX
 Oil
Oil
- Check oil level – add or replace oil as necessary
- Drain off an oil sample – look for evidence of foreign material such as water, metal shavings, or sludge
- Check for leaks around seals (particularly input pinion seals) – replace the seal if leakage seems excessive
- Check oil level – add or replace oil as necessary
- Some amount of backlash and endplay are necessary for proper gear life. If you have doubts about your gear box, consult a qualified service contractor
- Backlash – rotate pinion shaft back and forth, noting the amount of free rotation before the gear teeth engage fully
- Endplay – pull up and down on a fan blade tip, noting the amount of movement in the gear box output shaft
- Outside of the case – make sure they are free from excessive deposits, which may inhibit cooling
- Make sure hardware connecting the gear box to the support are tight and in good condition
DIRECT DRIVE FAN SYSTEM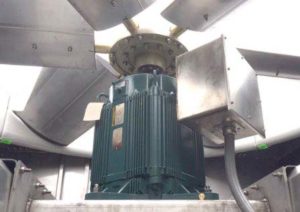
- Fan bushing – make sure it is tight on the motor shaft, and the bushing and its hardware in good condition
- Check the joints between the motor mount and its support
DRIVE SHAFT AND COUPLINGS
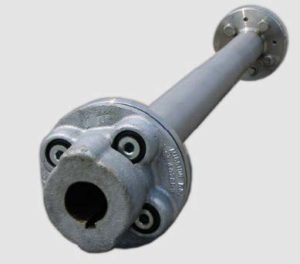 Check alignment using any approved method (i.e. a dial indicator or optical device)
- Tube – check for corrosion or other damage on the tube (near any welds)
- Check the connections between the tube and the flex elements, and between the coupling halves and the motor and gear box shafts
- Metallic flex elements – check for corrosion or fatigue
- Elastomeric flex elements – check for cracks, brittleness, or other signs of wear
- Span – most drive shafts consist of a single span; however, some still include two shafts together with an intermediate bearing housing support
- If your drive shaft includes a mid-span bearing, check the bearing carefully, adding lubricant as necessary
- Check alignment of both shafts and make sure that bearing hold-down hardware is tight and in good condition
- If you must replace any component in a two-shaft system, you should investigate replacing the entire system with a single span shaft which will reduce your maintenance costs dramatically
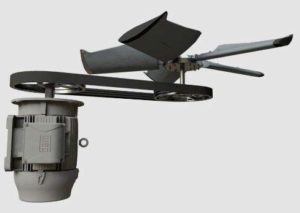
FAN
- Centrifugal blowers – check for broken or missing blades, corrosion, or erosion of the blades, (near any welds between the blades and the end plates)
- Check condition and tightness of hub and bushings between hub and shaft
- Propeller fans – either fixed-pitch (welded or riveted connections between the blades and hub) or adjustable pitch (bolted connections between the blades and hub and some means of readjusting blade pitch angle)
- Fixed-pitch fan – check for corrosion or erosion on blades, connections between the blades and hub, check the condition and tightness of bushing between hub and shaft
- Adjustable-pitch fan – check for corrosion, erosion, or excessive buildup of deposits on blades, measure the pitch angle of each blade, and readjust blades to the manufacturer’s recommended pitch angle within +1/2°.
- Check the tightness and condition of the hardware attaching the blades to the hub – tighten as necessary using manufacturer’s recommended procedures
- Examine connections between the hub cover (if there is one) and the fan hub
FAN CYLINDER (SHROUDS)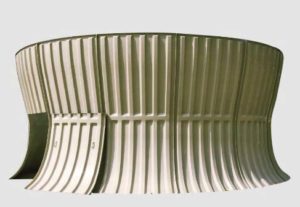
- Welds in steel shrouds – check the overall condition of material
- Assembly and hold-down hardware – check their condition and tightness
- Stack segments – check for leaks between adjoining segments
- Fan blade tip – measure clearance all around cylinder, using the longest fan blade
- Adjust tip clearance by adjusting the cylinder or support according to the manufacturer’s instructions.
MECHANICAL EQUIPMENT SUPPORT
- Steel components – check for corrosion or loss of metal (near welds and bearing surfaces)
- Check the tightness of connections – between mechanical equipment and support, and between support and tower structure
- Check the bolted connections in the support itself – make sure there is proper tightness and good condition of hardware
- Wood towers – check for evidence of iron rot wherever the support contacts the structure
- Steel and fiberglass towers – check the bolted connections between support and structure itself
MAKEUP VALVE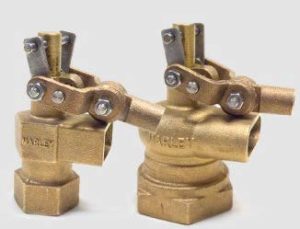
- Operate float valve or switch manually to make sure that it opens and closes properly